| THE ART OF THE CUTLER
In years past the late Tom Sewell wrote extensively in these pages about Jean Jacques Perret, the 18th century French master cutler and surgical instrument maker who was, very likely, the greatest knifemaker who has ever lived. Perret was the man who, beginning as a teen-ager, worked in and learned the trade secrets of every cutlery center in France. Perret was the man who did a full course of study at medical school, in order to improve the quality of his surgical instruments. Perret was the man who said that a practical test of a cutler's skill was for him to draw out from bar stock a steel wire 6-1/2 inches long and 1/6 inch in diameter, and then to drill a 1/12 inch diameter hole through this wire with his breast drill -- the long way. And Perret was the man who, in 1771, wrote and illustrated what is still the finest knifemaking how-to book ever published.
Perret's book is called L'Art du Coutelier -- "The Art of the Cutler". It includes three large thick volumes, the latter two dealing with surgical instruments, and all three illustrated with hundreds of splendid engravings.
Every aspect of knifemaking is covered, from engineering design and materials preparation, to the art of selling and shop management. Of course some of the material is obsolete, such as the parts pertaining to pre-Revolutionary French business practices, although even here we might learn a thing or two. Most of Perret's technical material, however, is as valid today as it was when it was published, over 220 years ago.
Today we might use power saws instead of hand saws to cut ivory, horn, or wood handle slabs, but the principles of sawing these materials to achieve stable dimensions and attractive grain have not changed at all. Today we might use refined steel alloys that Perret never dreamed of, and we might buy ready-made drill bits and lathe cutters where Perret made his own, but when it comes to shaping those alloys and using those tools, Perret could teach most of us a lot more than we could teach him.
I imagine that Perret would be pleased to see the current popularity of damascus steel in hand-made knives today, both in America and in his native France. Perret made many damascus knives and swords, as did other Parisian cutlers both before him and after him. Some of his contemporaries even made fake damascus, and Perret exposed their shady methods.
As far as we know, no one in Europe at that time made eastern damascus, what we now call Wootz. However Perret and his fellow European cutlers were familiar with that material, and recognized that it was different from their own product. Perret called it le Damas naturel "natural damascus." Since we now know that the pattern in Wootz forms spontaneously, this seems to be a very appropriate name.
Damascus steel was such a popular topic in Perret's own day that he felt called upon to include an entire chapter on its fabrication in The Art of the Cutler. This is Chapter 29, "Maniere de faire l'Acier facon de Damas" ("Method of making Steel in the style of Damascus"). Here is a somewhat loose translation. [Note: the "inches" (pouces) referred to are French Royal inches, which are 1/12 longer than our English inches.]
| |
Method of making Steel in the style of Damascus
Jean Jacques Perret, 1771
We might have discussed this steel in the chapter on materials, because it is one. However, since it is not appropriate for fine cutting edges, we believed it our duty to treat it separately, although this steel does serve very well for making table knives.
This material, which closely imitates "natural" damascus, can become costly. This is because of the time required [to make it], as well as because of the quantity of coal one must employ, and the diminution of the metal [during fabrication]. If one wishes to make 3 pounds weight, it is necessary to start with 6 pounds weight of raw material.
Start out by forging six thin plates of iron, exactly identical in all respects. Let us suppose that they are each a pouce (an inch) wide, a ligne (1/12 inch) thick, and 12 inches long. Then forge five thin plates of steel, identical in form to those of iron, making in total eleven thin plates. The more plates one uses, the finer the material will be. Stack these plates one atop another, but be sure to put each steel plate between two of iron, which means starting and finishing with an iron plate. This is how it must be done, no matter how many plates one uses. This should become clear from Figure 1.[In the figure] each thin plate is numbered from 1 to 11, and under each number one sees a letter that designates the material: A for Acier (steel) and f for fer (iron).
| |
 | |
Once all this is properly arranged, grasp all the plates with a tongs. Clamp the handles of the tongs with an "S" as shown in Chapter 12. Place this stack in a moderate fire. Raise the temperature so that all the plates heat uniformly through and through, but do not allow any of them to burn. To this end, turn the packet often in the fire, without removing it, and then let it rest in the fire a little while. The plates that are in the center will not heat up as fast as those on the outside, mainly because the latter receive heat directly from the coals, while those in the center receive none except from their neighbors. Finally, when the whole thing is uniformly hot, moderate the pumping of your bellows, "sand" [i.e. dust with flux] the material at least twice after each heat, and forge it squarely, working it down to a thickness of 8 or 9 lignes (2/3 to 3/4 inch) on a side. After this is done, heat the material up to a bright red, but not quite white, and clamp one end in the vice, as shown in Figure 2.
| |
 | |
With stout tongs twist the material from one end to the other, as evenly as possible, so that it resembles a screw, as shown in Figure 3.
| |
 | |
Now it is necessary to flatten and forge it out to a width of 9 lignes (3/4 inch) and a thickness of 3 lignes (1/4 inch). After this fold it in two [the long way], in the manner shown in Figure 4.
| |
 | |
All this work, up until now, is for nothing other than to form a strong tenacious covering, such that no effort or power can break it apart. The plates of soft iron are thoroughly welded, married, and entwined with the ones of steel, forming together an extremely tough material, more tough than either component. The iron and steel are well bonded together, and the individual particles of each are very small. However, it is not possible for this material to be given a really fine cutting edge. The "veins" of iron that wind throughout prevent it. Make, therefore, a thin plate of good German steel 9 lignes wide, Figure 5, (that is, the same width as the covering), and at the very most 2-1/2 lignes thick; its length must be equal to that of the covering which has been folded in half.
| |
 | |
Put this steel plate between the two sides of the covering. Then forge weld the whole assembly. Do not overheat the billet. Avoid striking it too hard. Use only the face of the hammer. Shape the surfaces squarely, so that the steel remains always in the center of the billet, because upon this depends the quality of the cutting edge. Then draw out the billet to the length and width which you require.
A blade made from damascus material can never break, save only by forcefully bending it back and forth many times. Therefore it makes a strong knife. And if one tempers this knife to the color of red copper, after having hardened it at a cherry color, one would be able to cut iron very readily with it, without the edge chipping, provided however that one made the edge a bit thick and rounded. But if one is making this knife to cut food at the table, and one does not wish to show off with it, one should give it a little finer cutting edge, which requires no more than tempering it to a gold color, instead of red copper color. Then one will have a good tool which will cut well, and which will keep a good edge for a long time.
If men did not seek so often to pinch pennies on that which is useful, all the while making huge expenditures on useless ornamentation, then instead of having a sheath knife worn at one's side whose blade cost not even 40 sols (five-cent pieces), but whose mounts cost 60 livres (pounds); one might instead have a blade which cost 60 livres, in mounts which cost 40 sols. Nothing can make a better blade for a Couteau de chasse (literally a "hunting knife," but actually a hunting sword, or hanger) than damascus material just as I have described. Its utility is found in the implement's requirements [chopping through bones]. The object for which this material is nearly indispensable is the Damas a decoler, the damascus beheading sword.
| |
 | |
Figure 6 represents the one which is used by the Honorable Mr. Sanson. [Charles Henri Sanson, 1740-1795, was the public executioner in Paris. He was to preside over the execution of Louis XVI in 1793.] His sword is 9 inches long in the handle, between A and B, and 3 feet in the blade (3 French feet, or 39 English inches). The width is, at the base of the blade, 2-1/2 pouces, tapering very slightly to C. Its thickness below B is three lignes (1/4 inch), but it thins steadily right up to the point, where it is but one ligne (1/12 inch) thick at C. This makes it more flexible than an epee. It is double-edged and does not have a sharp point. On the contrary it is well-rounded, because a sharp point can get stuck in the vertebrae. Being rounded and well polished, it slides and cuts easily. Its edges are the same on both sides, and it is as keen as a fine pen knife that is used for sharpening quills. It is necessary that it be polished the long way on a polishing wheel which is at least an inch wide, taking careful precautions not to injure oneself. It must be honed on a razor stone, or else on a fine-grained Levant stone. This is what I have always done.
On might well think that forging damascus material and forging pure steel are much the same thing; in either case one must treat them with "art" in order to preserve their "virtue." However, it is necessary to forge damascus with a great deal more care. Once it is completely welded throughout, it is not necessary to give it additional welding heats. Most of all, in the final heats, do not heat it past cherry color, and in the last heat past the color of bronze. Then hammer the material well until it is cold. One need not be ashamed to use files to shape it. File it without additional reheating.
The hardening, which gives the final touch of quality to this material, must be done with all possible attention. For such a piece as this, do not use just any forge. Instead light, on the ground, a charcoal fire of sufficient size to surround and heat the entire piece. When the fire is burned down to coals, put the piece in the center and cover it completely with hot coals. Do not use a bellows, but only agitate the air with a piece of cardboard, or something equivalent. Pay attention that the blade heat uniformly throughout. As soon as it has reached a bright cherry color, plunge it into a big bucket of water, or a big cask of water if the hunting sword or saber is three feet long.
Some people brag about certain other hardening methods which, if truth be told, do not have anything wrong with them. However, since we discussed this subject elsewhere, I will not say any more about it here. I will merely point out that with proper attention paid to forging the steel, and to the degree of heat in the hardening, plain cold water is worth more than all the ingredients which one might add to contaminate it.
When damascus is polished, the eye of the connoisseur can judge if it is really damascus, because one can distinguish the flowing whitish veins of the iron from the bluish veins of the steel. However, for giving effective color to damascus, and to make those veins stand out, pour a little eau forte [dilute nitric acid] on to the piece (completely finished). Spread it out over the entire length of the blade with a feather. Leave the acid on the blade for the space of 6 or 7 minutes. After this time rinse the blade with clear water, dry it, and you will find it damassee, which is to say one may readily distinguish the veins of steel from those of iron.
In general, steel is subject to having closely spaced veins. [This is a feature of shear steel, the best type available in 18th century France.] In consequence one can be fooled, and buy steel blades which are not damascus, because it is only necessary to wipe a knife, a razor, &c, with some acid, to give it the color of damascus. However, one can judge [real damascus] by the regularity of the "flowers," and by the veins of iron which flow with a sort of regular symmetry. On can also recognize damascus steel, worked the way we have described, by its being largely forged to shape, and because its veins are small and evenly distributed, and because the metal is of good quality.
I have seen some hunting swords which were sold as damascus, but which I suspected not to be, in part because the blackish veins were too deep, and in part because their edges would not cut iron. Indeed their edges were so blunt and ill-shaped that they would not even cut wood. I tried to discover the method of "damascening" blades as boldly as these. After several trials I took a blade of polished steel and I covered it with a coating of wax, which I let drip from a lighted candle. I spread the wax evenly over the entire surface. Then I drew a quantity of lines in the wax, using a steel scribe which served me as a pencil. After that I poured some acid on the wax. I allowed it to bite or dissolve the steel which my "pencil" had uncovered for about an hour. I then cleaned it off, and found that I had discovered the whole secret.
Figure 7 shows a hunting sword with blade made of damascus.
| |
 | |
 |
Saturday, April 9, 2016
Method of making Steel in the style of Damascus
Bringing Ancient Sounds Back to Life
Music is the “sound-evidence” of Europe’s ancient common roots.


Long before the Old Continent became known as Europe and before the presumed "history of music" began, musical instruments played a key role in creating a network of interconnections, cross-references and shared features among the various European cultures.
The European Music Archaeology Project (EMAP) is the first organic journey from the sounds of Prehistory through to traditions which still survive today, taking us from very early music to the present day composer and blending archaeology and art, science and creativity.
The European Music Archaeology Project (EMAP) is the first organic journey from the sounds of Prehistory through to traditions which still survive today, taking us from very early music to the present day composer and blending archaeology and art, science and creativity.
Concert
From the Cave to the Rave - April 9th, 2016, 19:30 - Venue: Royal Conservatoire of Scotland, 100 Renfrew Street, Glasgow, UK
Astounding reproductions of ancient musical instruments and sound tools - from European prehistory until the dawn of Western Music - will be gathered together in Glasgow for the very first time, and played by a large ensemble of music specialists. EMAP musicians - groups and soloists coming from across Europe - will lead the audience in a special tour through our common past, dating back up to many thousands of years ago.
Concert
Dragon's Voices - The Ancient Celtic Music of the Carnyx
John Kenny performs wind music on ancient horns from the Bronze Age and Iron Age
November 19th, 2015, 7:30 PM - Venue: St Paul's Hall, University of Huddersfield
Leading Scottish music archaeology performer John Kenny, plays music which illustrates
the early
development of wind instruments. He will perform on a reconstructed model of the 2,000 year-
old Tintignac Carnyx as well as two others from Deskford, along with a number of other
ancient horns and a reconstruction of the Loughnashade Horn, an Iron Age instrument from
Ireland.
 Conference and concert Conference and concertViterbo, November 11th – 14th, 2015, Aula Magna del complesso storico di S. Maria in Gradi, Università degli Studi della Tuscia Brass instruments play an important part in EMAP, partly because so many have survived and partly because they played such an important role in both the ritual and artistic life of the past. The 2015 EMAP Conference in Viterbo will gather together all these instruments to celebrate their past, bringing with them researchers, makers and players to join together in the task of reawakening the spirits of the ancient world.  Seminar and Workshop Seminar and Workshop
Instrumentos musicales de barro: Arqueología, Etnografía y Experimentación
(Clay Musical instruments: Archaeology, Etnography and Experimentation)
Spain (Bailén), 8-11th September 2015
The University of Valladolid and the European Music Archaeology Project are organizing
in Bailén (Jaén) a Seminar and Workshop in collaboration with the Municipality of Bailén,
a village well known for its ancient pottery traditions. The seminar will be dedicated to the
study of the production process of clay musical instruments both from the perspective of
archaeology and ethnography, bringing together researchers and traditional craftsmen.
 
ARCHÆOMUSICA
Exploring the Sounds and Music of Ancient Europe
The exhibition will tour Europe between June 2016 and December 2017 (for the venues, click here). Drawing upon innovative approaches to exhibition making, an experience of the dimensions of sound and space of past cultures will be made possible using visual and multimedia approaches. Visitors will discover an unheard world of sound in ancient Europe, in which the unifying elements of music without boundaries are a constant theme.
The exhibition reflects the diverse nature of music-archaeological research, from discovery to instrument making and experimental playing, and from experimental playing to sound design and soundscape research. Wherever it travels, it will be accompanied by a programme of satellite events, with artists selected from a large pool of professional musicians, performers, lecturers and instrument makers (for the events, click here).
High-quality replicas of ancient sound artefacts and depictions will be provided both for visual display and hands-on exploration. In support, interactive multimedia materials will accompany the physical artefacts. The multimedia materials will be designed according to the most up-to-date international exhibition standards, linking visual and performing arts and scientific research in an innovative way.
|
MUSIKALISCHES OEUVRE IX (ZU LEBZEITEN PUBL. KL. WERKE)
Notturno (Guarda che bianca luna)
Occupation:
Soprano, tenor and bass obbligato flute and piano
Text:
Jacopo Vittorelli
Emergence, Autograph and expenditures:
dated: February 26, 1839. Autograph: Milan, Museo teatrale alla Scala - Score: Milan: Canti [1839] # 392..
Genesis, text and commentary
Musicological essays & Publications
Duration:
Approximately 4 minutes
discography:
The discographic information will be published here as soon as possible.
Back to the main body of work? (Click here)
Back to the main foundation? (Click here)
MUSICAL OEUVRE IV
(With additional OPERN. BALLET MUSIC)
Nabucodonosor (Nabucco)
| Sei romanze II (1845) |
1. Il tramonto (Amo l’ora del giorno che muore) 2. La zingara (Chi padre mi fosse, qual patria mi sia) 3. Ad una stella (Bell’astro della terra) 4. Lo spazzacamino (Son d’aspetto brutto e nero) 5. Il mistero (Se tranquillo a te daccanto) 6. Brindisi(Mescetemi il vino!)
|
 |
Besetzung:
Sopran/Tenor und Klavier.
Texte:
1., 3. und 6. Andrea Maffei; 2. und 4. Manfredo Maggioni; 5. Felice Romani
Entstehung, Autograph und Ausgaben:
vor 1845. Autograph: Mailand, Verlags-Archiv Ricordi – Ausgaben: Mailand: Lucca [1845], Nr. 5640–5645;Composizioni da camera per canto e pianoforte, Mailand: Ricordi 1935, Nr. 123381.
Aufführungsdauer:
Ca. 18 Minuten.
Diskographie:
Die diskographische Information wird so bald wie möglich hier veröffentlicht.Six Romance II (1845)
1. The sunset (I love the man of the day he dies) 2. The gypsy (Chi father was to me, which is home to me) 3. For a star (Bell'astro earth) 4. The Chimney Sweep (Son waiting ugly and black) 5. the mystery (If you quiet daccanto) 6. Brindisi (Pour me some wine!)
Besetzung:
Sopran / Tenor und Klavier.
texte:
1., 3. und 6. Andrea Maffei; 2. und 4. Manfredo Maggioni; 5. Felice Romani
Entstehung, Autograph und Ausgaben:
vor 1845. Autograph: Mailand, Verlags-Archiv Memories - Ausgaben: Mailand: Lucca [1845], no. 5640-5645; Chamber compositions for voice and piano, Mailand: Remember 1935, Nr. 123381.
Entstehungsgeschichte, Text und Kommentar
Musikwissenschaftliche Aufsätzen & Publikationen
Aufführungsdauer:
Ca. 18 Minuten.
Diskographie:
Die diskographische so bald wie möglich Information wird hier veröffentlicht.
|
About Moulin Rouge
“With the old kindness, the old distinguished grace,
She lies, her lovely piteous head amid dull red hair
Propped upon pillows, rouge on the pallor of her face.
She would not have us sad because she is lying there,
And when she meets our gaze her eyes are laughter-lit,
Her speech a wicked tale that we may vie with her....”
—William Butler Yeats (1865–1939)
“Right now I think censorship is necessary; the things they’re doing and saying in films right now just shouldn’t be allowed. There’s no dignity anymore and I think that’s very important.”
—Mae West (1892–1980)
Famous quotes containing the words film and/or music:
“All the old supports going, gone, this man reaches out a hand to steady himself on a ledge of rough brick that is warm in the sun: his hand feeds him messages of solidity, but his mind messages of destruction, for this breathing substance, made of earth, will be a dance of atoms, he knows it, his intelligence tells him so: there will soon be war, he is in the middle of war, where he stands will be a waste, mounds of rubble, and this solid earthy substance will be a film of dust on ruins.”
—Doris Lessing (b. 1919)
—Doris Lessing (b. 1919)
“In benevolent natures the impulse to pity is so sudden, that like instruments of music which obey the touch ... you would think the will was scarce concerned, and that the mind was altogether passive in the sympathy which her own goodness has excited. The truth is,—the soul is [so] ... wholly engrossed by the object of pity, that she does not ... take leisure to examine the principles upon which she acts.”
—Laurence Sterne (1713–1768)
—Laurence Sterne (1713–1768)
Tuesday, April 5, 2016
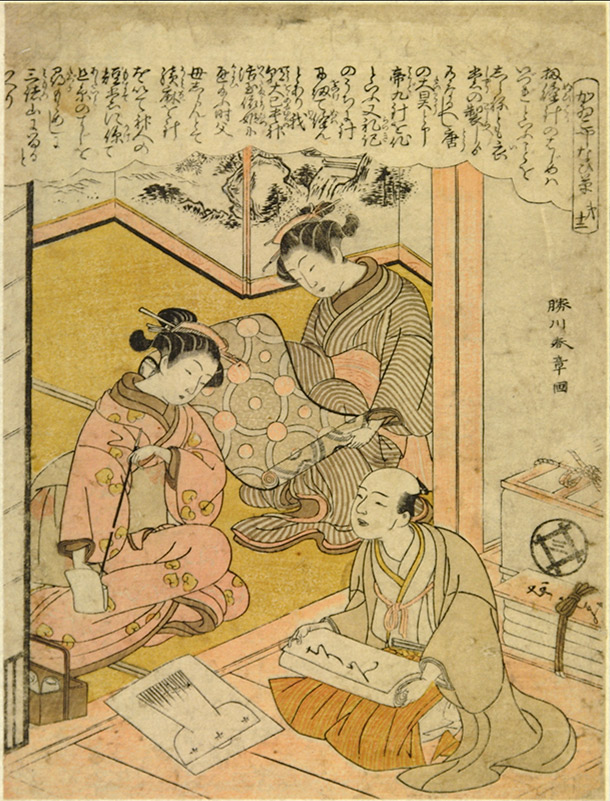
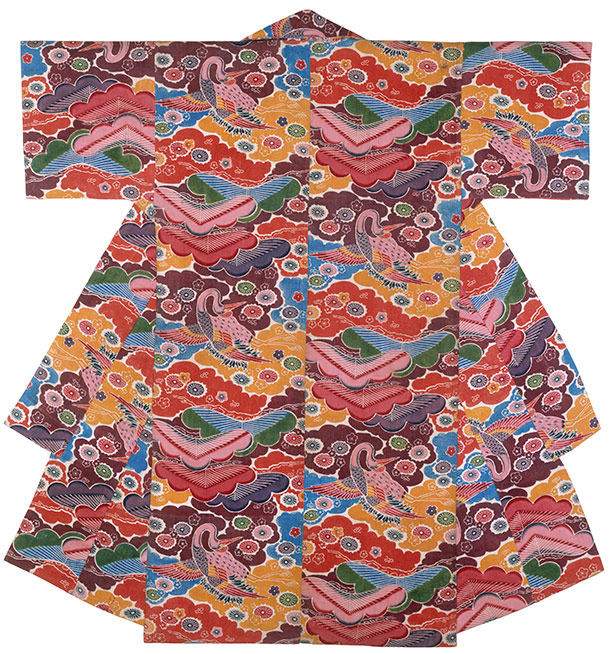
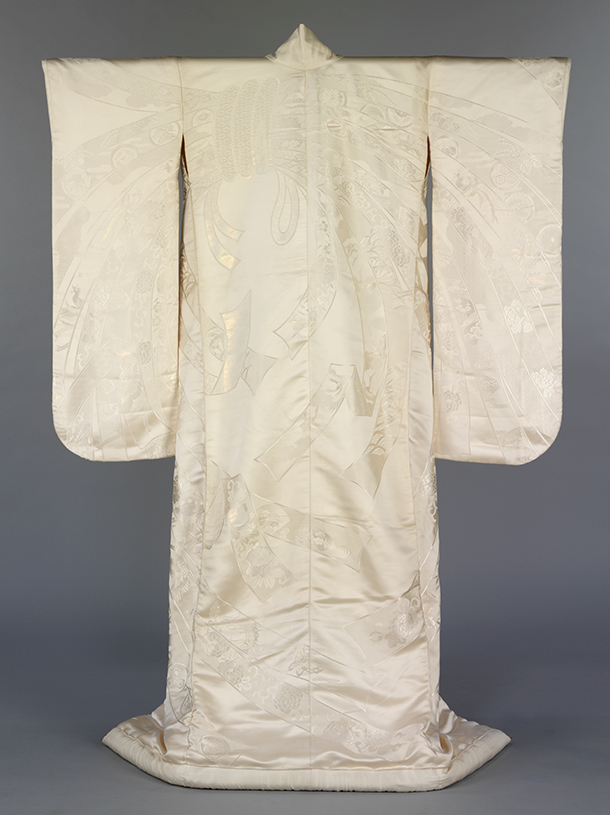
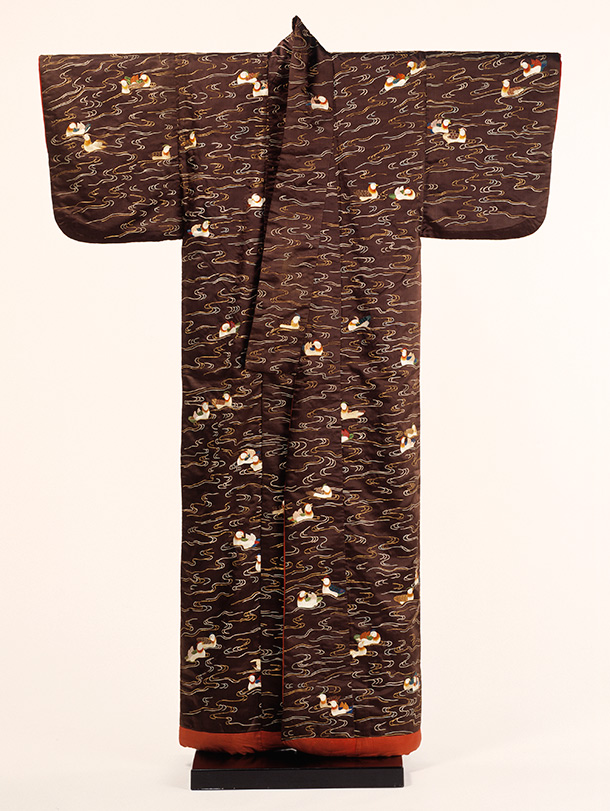
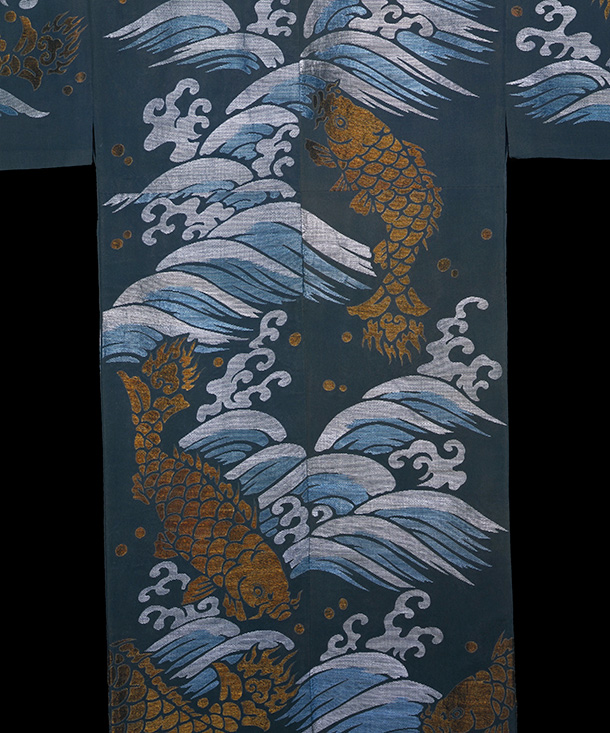
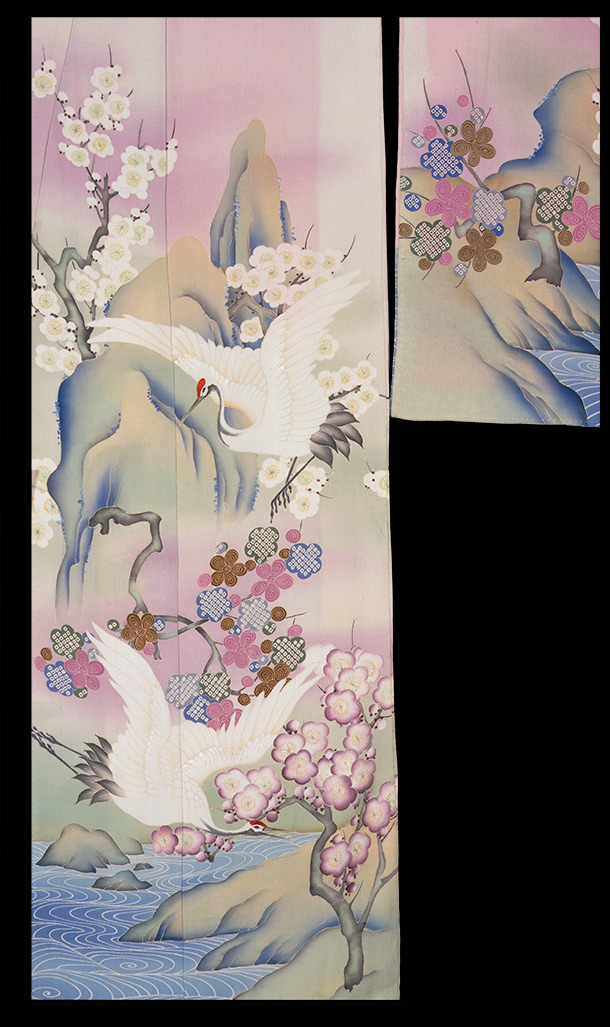
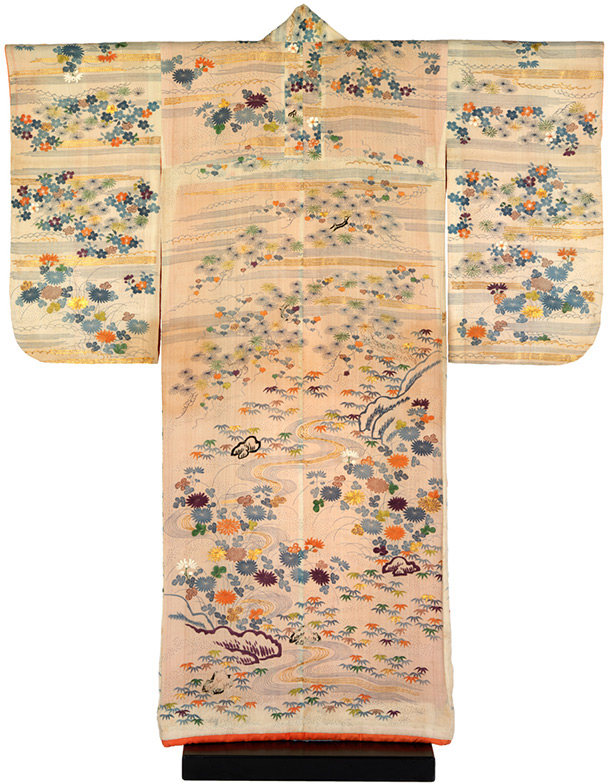
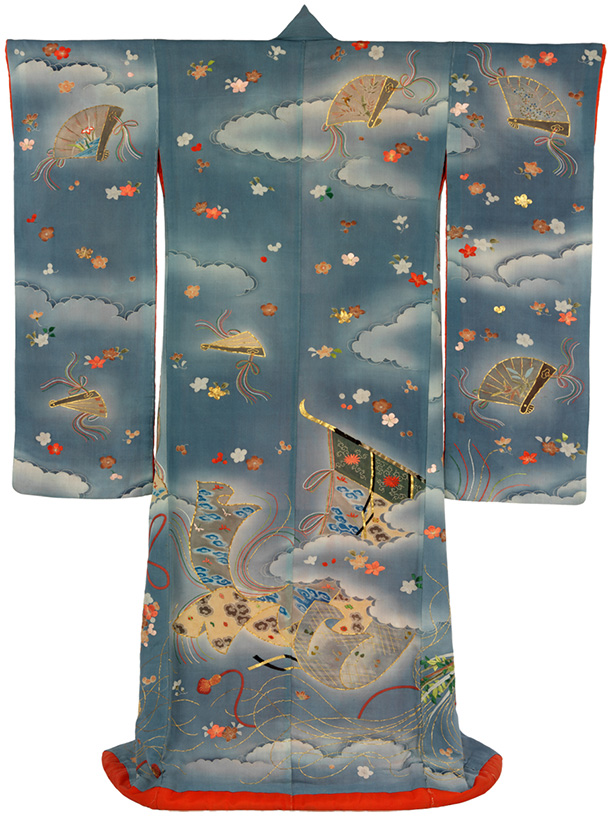
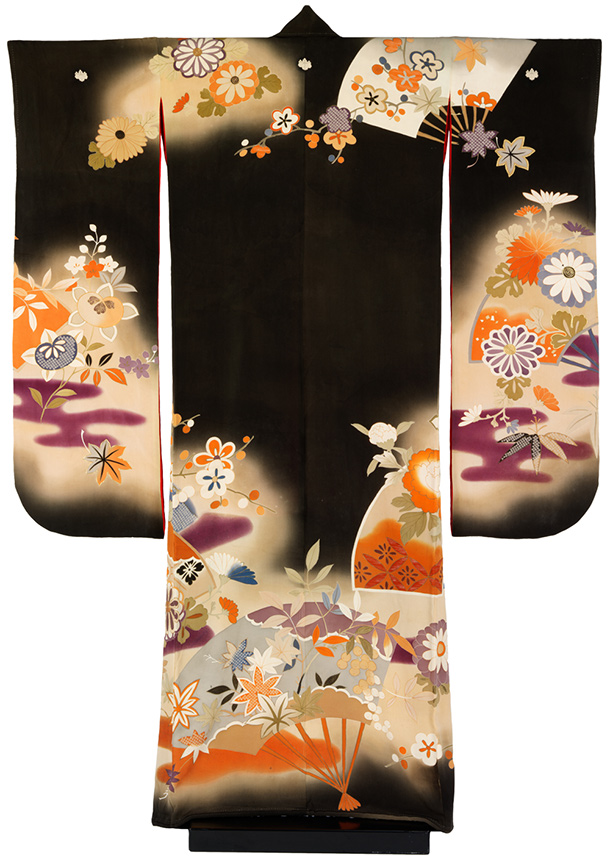
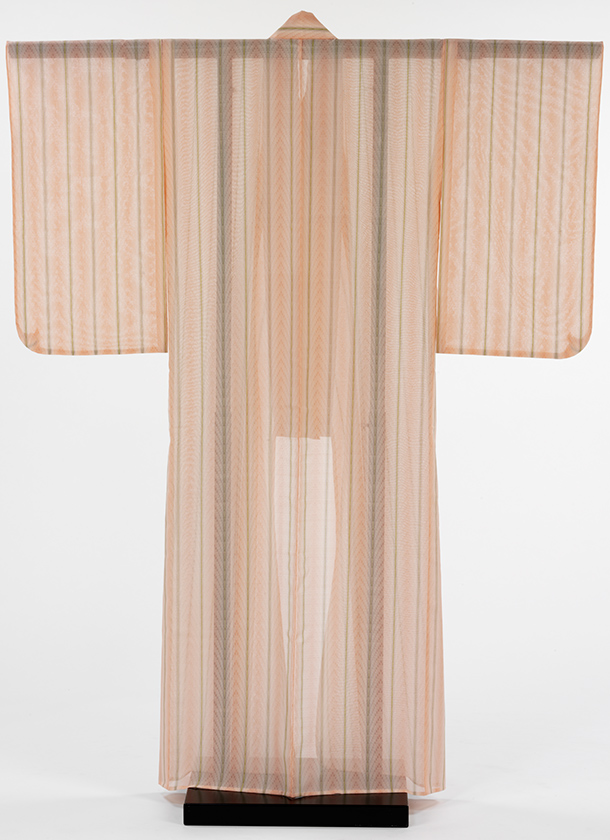
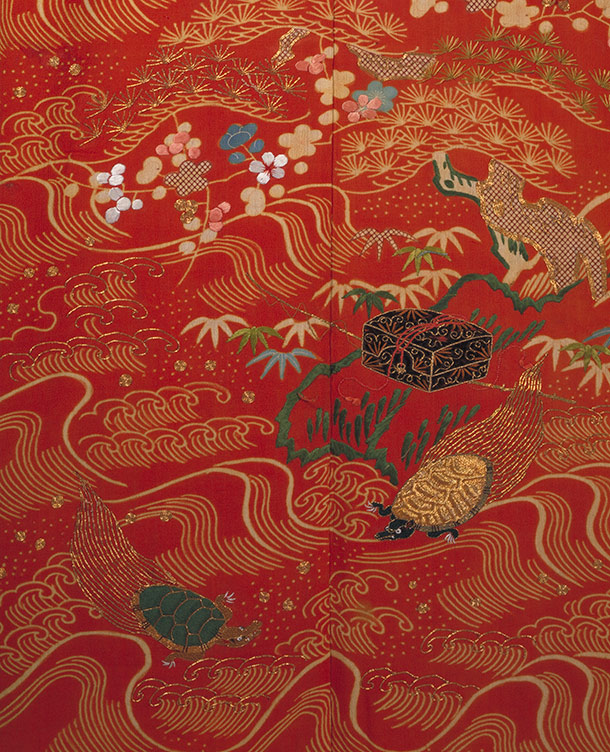
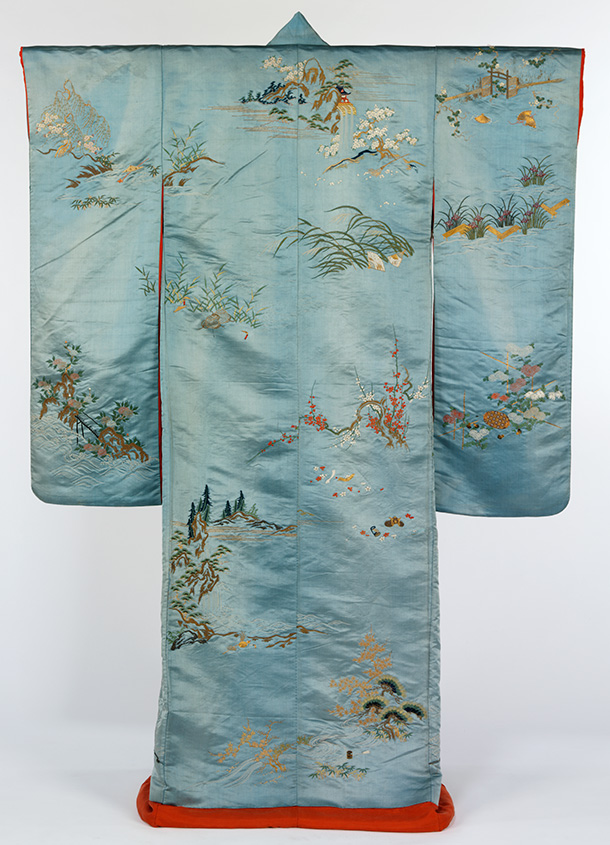
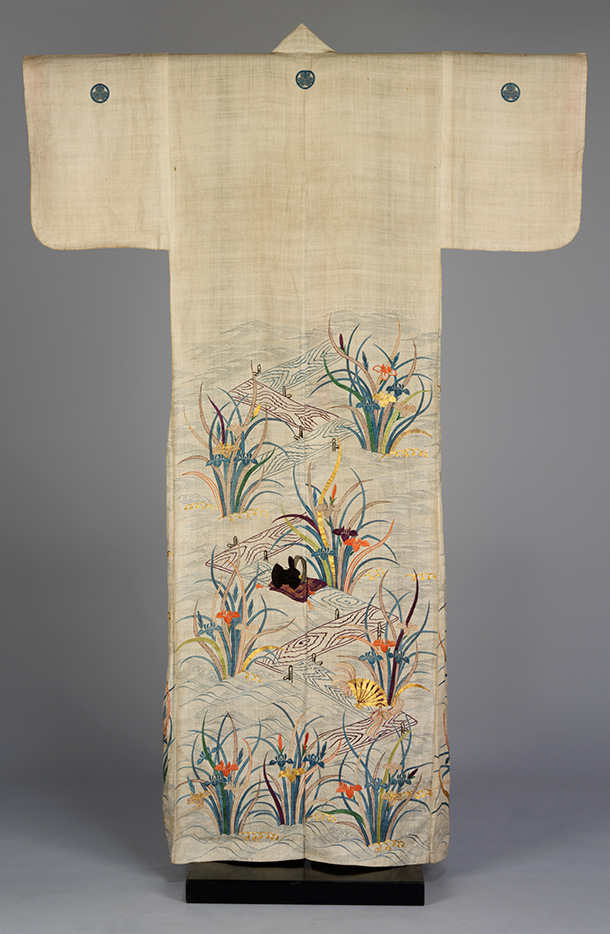
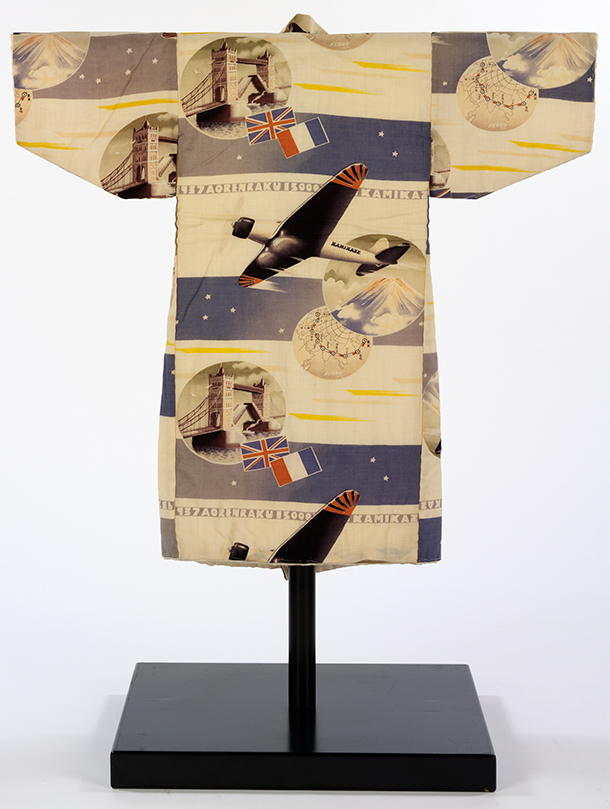
The Story Behind Kimono
Woodblock print, 'The Cultivation of Silkworms', Katsukawa Shunsho (1726-1792), Japan, 1767-1768. Museum no. E.1360-1922, © Victoria and Albert Museum, London
Dyeing techniques
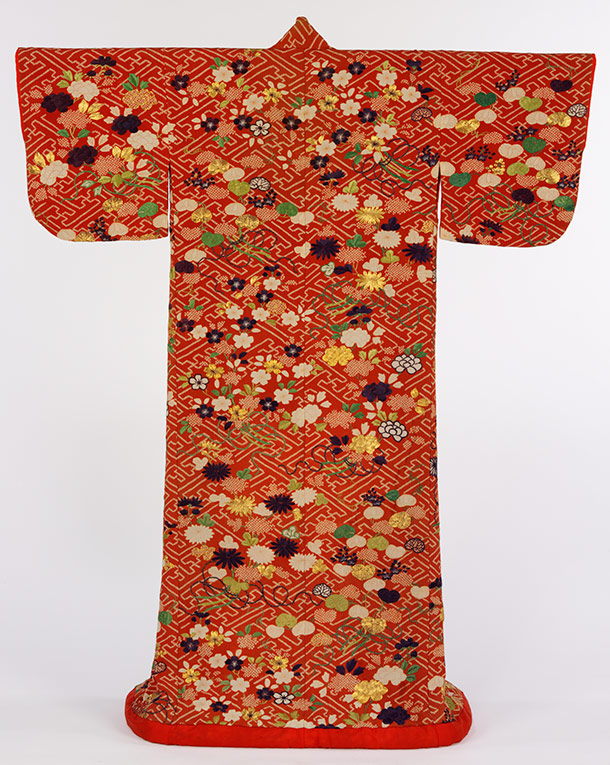
Embroidery
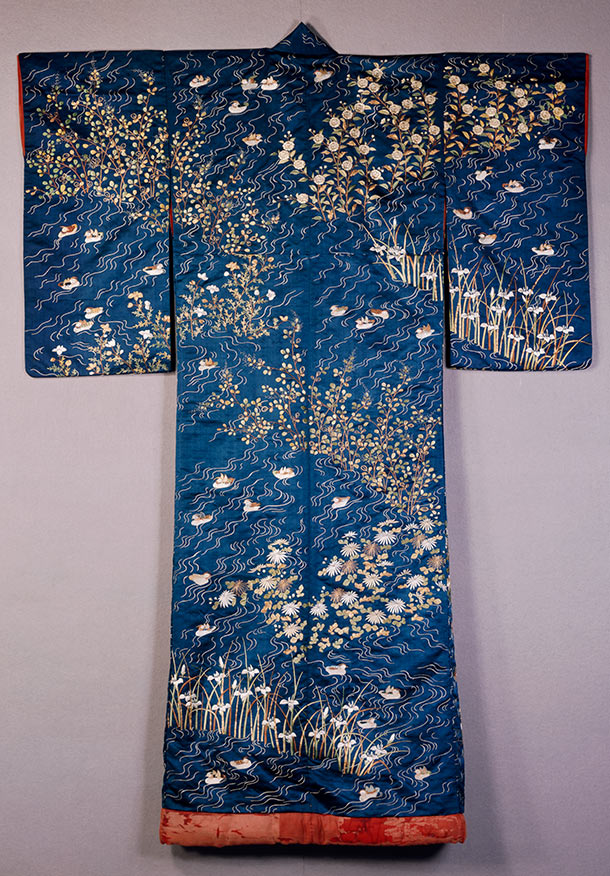
Weaving techniques


Subscribe to:
Posts (Atom)